Unfortunately, some of Excel’s default settings can have text aligned on corresponding sides of cells (for example, a left cell that is right-justified and a right cell that is left-justified). You can justify text in Excel by selecting the cells to justify, clicking the Home tab, then clicking the appropriate horizontal or vertical justification button. It can become difficult to discern where information from one cell ends and information from another cell begins, so you will need to justify your data within its cell. Justifying text or numbers will force the data into the location within the cell that you choose. Data can be horizontally justified to the left, center, or right and it can be vertically justified to the top, middle or bottom. Finally, there is also a Wrap Text option, as well as Horizontal and Vertical Justify options that you can use if you have a string of text that is too large for its’ current cell. Continue reading to learn how to justify your text in Excel 2010.
How to Use Text Justification Options in Microsoft Excel
Our guide continues below with additional information on horizontal and vertical justification in Excel spreadsheets, including pictures of these steps. Google apps have similar options. You can check out our guide on Google Sheets text wrapping not working if you are having difficulty with that tool.
How to Vertically or Horizontally Justify Text or Numbers in Excel 2010 (Guide with Pictures)
You can dictate the location in a cell of nearly any type of data that you might put into that cell. This is helpful for presenting data that is easier to read because it can separate data that might otherwise cluster together in the default settings.
Step 1: Open the Excel file that contains the data you want to justify.
2. Click the cell, row or column that you want to justify.
If you want to justify all of the values in a row or column, you can click the row heading or column heading at the left or top of the window, respectively.
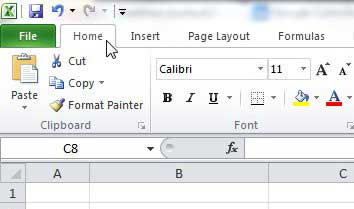
3. Click the Home tab at the top of the window.
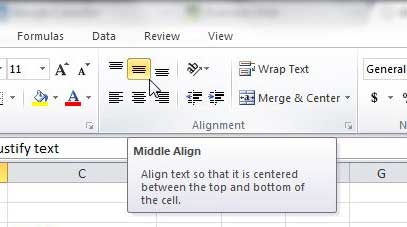
4. Click the horizontal justification setting in the Alignment section of the ribbon that you want to apply to your selected cell.
The available horizontal justification buttons are:
LeftCenterRight
5. Click the vertical justification setting in the Alignment section of the ribbon that you want to apply to your selected cell.
The availabel vertical justification options are:
Top AlignMiddle AlignBottom Align
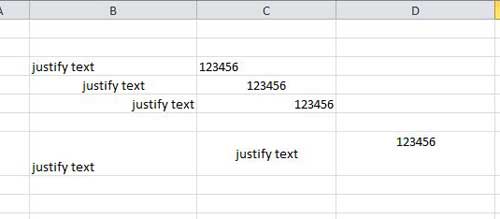
The image below shows some example of text and numbers that have been horizontally and vertically justified. Once you have made the cell large enough, you should be able to justify the cell value to get it into the location you desire. The default settings for cell sizes will probably make it difficult for you to notice any difference in vertical justification. However, you can make vertical adjustments more pronounced by making the row taller. Click on the bottom dividing line of a row heading and drag it down to increase the height of a row. You can use the same instructions with the right dividing line of a column heading to make columns wider, too.
How to Justify Text That is Overflowing from One Cell in Excel 2010
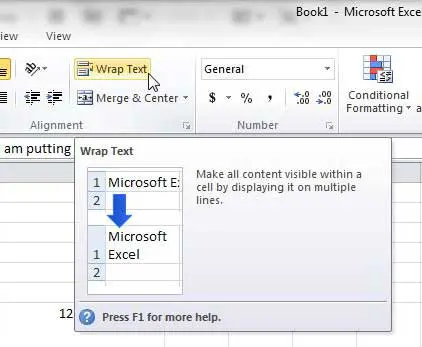
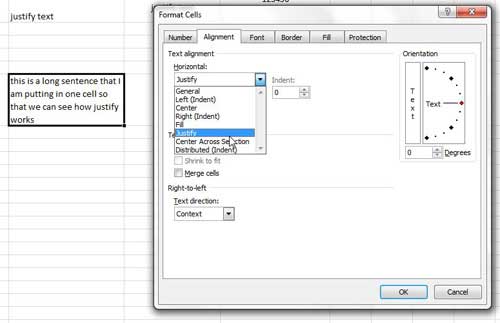
Some people might argue that the instructions above are actually meant to align the information in a cell, and they would not be wrong. However, in my experience, I have noticed that a lot of people use the terms “Justify” and “Align” interchangeably. If you want to use the Justify option in Excel 2010, you can do a type of justification by clicking the Wrap text button in the Alignment section of the Home ribbon. This will adjust the text in your cell so that all of the text is displayed within the cell, without spilling over into other cells. You can also choose to vertically or horizontally justify a cell by right-clicking the cell, clicking Format Cells, then clicking the drop-down menu under Horizontal or Vertical, and choosing the Justify option. Using a combination of all of the tools mentioned in this article, you should be able to achieve your desired justification effects in Excel 2010.
Can I Change Horizontal Alignment and Column Width from the Format Cells Dialog Box?
The Format Cells dialog box, which we navigated to above when using the Justify option on the Horizontal dropdown menu, has six tabs at the top of its window. These are:
The Number tabThe Alignment tabThe Font tabThe Border tabThe Fill tabThe Protection tab
As we have seen in the section above, this allows you to align text and modify the cell alignment, whether you need to change horizontal alignment or vertical alignment. There is also a Text control section that you can use when you want wrapped text. If you can’t resize properly because there is too much text, for example, then you could check the “Shrink to fit” option and have Excel take care of it for you. Additionally, if you have multiple cells selected then you could check the Merge cells box and have Excel convert the individual cells into one larger cell. This can be an easier way to see text alignment adjustments, as they are more prominent after merging cells. If you want to change column width then you will need to right-click a column letter at the top of the spreadsheet and select the “Column Width” option there. You won’t find an option for it in the Format Cells menu.
More Information on Using Left Alignment or Right Alignment in Excel
While the steps above were performed in the 2010 version of Microsoft Office, they will still work in more recent versions of Excel, including Excel for Office 365. The buttons are still found in the Alignment group on the Home tab as well. You can also apply the various alignment options using keyboard shortcuts. They’re a little different than some other shortcuts you may have used, however. These shortcuts are:
Left Align – Alt + H, then press the A + L key togetherCenter Align – Alt + H, then press the A + C key togetherRight Align – Alt + H, then press the A + R key togetherTop Align – Alt + H, then press the A + T key togetherMiddle Align – Alt + H, then press the A + M key togetherBottom Align – Alt + H, then press the A + B key together
If you are often working with aligned or justified text then becoming familiar with these shortcuts can real a real time saver.
Additional Sources
After receiving his Bachelor’s and Master’s degrees in Computer Science he spent several years working in IT management for small businesses. However, he now works full time writing content online and creating websites. His main writing topics include iPhones, Microsoft Office, Google Apps, Android, and Photoshop, but he has also written about many other tech topics as well. Read his full bio here.
You may opt out at any time. Read our Privacy Policy
