While you might have found a way to make it helpful on your computer, however, the printed versions of your spreadsheets might be hard to understand when that row isn’t on each page. Our tutorial on how to set row 1 to print on every page in Excel continues below with more information about customizing the print layout of your spreadsheets.
How to Print the Top Row on Every Page in Excel 2016
Our guide continues below with additional information on print row 1 at the top of every page in Excel 2016, including pictures of these steps. Microsoft Excel spreadsheets (and Google Sheets spreadsheets, for that matter) can be difficult to read when you are working with a lot of data. While changes like printing gridlines, fitting all of your columns on one page, or putting page numbers or titles in the header can be helpful, your readers can also benefit if you include your column headings on each page. This guide is going to show you how to set row 1 to print on every page. We list the steps at the beginning of the article, but you can continue reading after to see the steps with pictures. There are many ways that you can format a printed spreadsheet so that it is easier to read on paper. Our Excel print guide offers many of these solutions, but one of the more commonly used print adjustments involves printing the first row of your spreadsheet at the top of every page. If you have a large spreadsheet that contains many columns with similar types of information, then that information can become much more difficult to read when the reader gets to the second page and loses the identifying column title that appeared on the first page. This can lead to mistakes and misunderstandings, which is something that we want to avoid as spreadsheet creators. So continue reading below and learn how to print the top row of your spreadsheet on every page in Excel 2016.
How to Repeat the Top Row on Every Printed Page of an Excel 2016 Spreadsheet (Guide with Pictures)
This guide was written using Microsoft Excel 2016 but is very similar in other versions of Excel as well. And while we are specifically going to focus on printing the top row on every page, you can adjust these steps to print more than one row, or even print a column on each page, if you would prefer.
Step 1: Open your spreadsheet in Excel 2016.
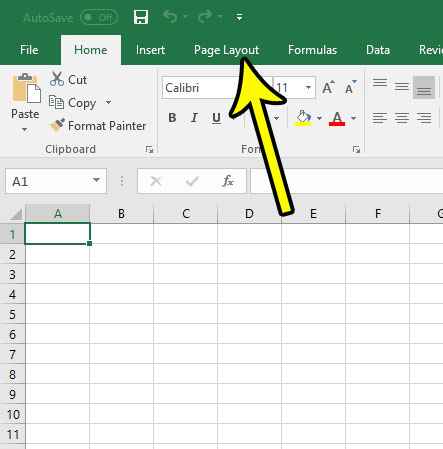
Step 2: Click the Page Layout tab at the top of the window.
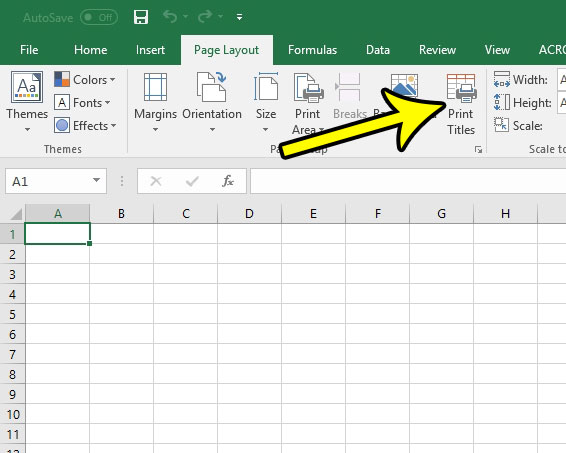
Step 3: Click the Print Titles button in the Page Setup section of the ribbon.
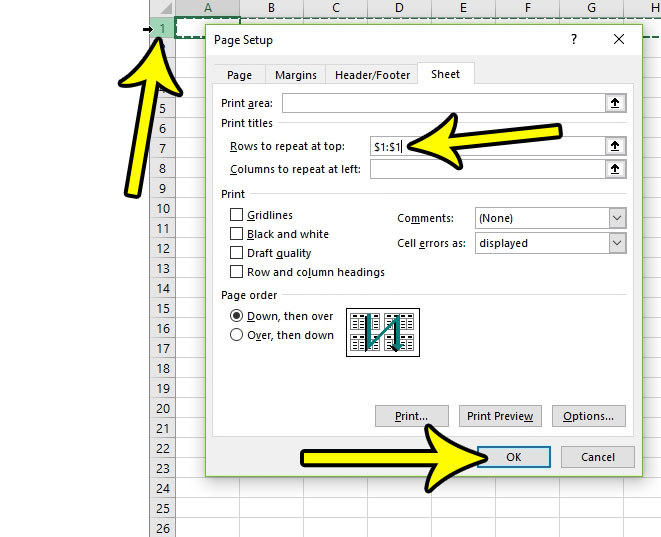
Step 4: Click inside the Rows to repeat at top field, click the “1” row number (this should add $1:$1 into the field), then click the OK button.
You can then proceed with printing your spreadsheet as normal, except this time the first row will be at the top of each page.
How Do I Open the Page Setup Dialog Box in Excel?
Many of the important options that you need to format a printed Excel spreadsheet are found on the Page Setup window. But this window isn’t easy to find if you haven’t had to open it before. At the bottom-right corner of some of the sections in the ribbon is a small box with a diagonal arrow on it. If you click that button it will open a menu with settings appropriate to that section. In Excel you can select the Page Layout tab at the top of the window, then in the Page Setup group click that button to open the Page Setup dialog box. This dialog box includes tabs labeled:
Page Margins Header/Footer Sheet
If you select each of those tabs you will see ways that you can customize the appearance of your spreadsheet. For example, if you click the Sheet tab you will find the same menu that we accessed with the Print Titles command in the steps above. This includes the Rows to repeat at top box, Columns to repeat at left box, Gridlines, Row and column headings, and more.
More Information on How to Set Row 1 to Print on Every Page – Excel 2016
The steps in this article are focused on printing row one at the top of every page of your spreadsheet, but you can use the same steps if you want to print a different row, or if you want to print multiple rows. To print multiple rows you would simply need to click and drag down when selecting the rows, rather than just click on the row 1 heading. If you want to repeat column A at the left side of each page in Excel then you would click inside the Columns to repeat at left field on the Page Setup dialog box, then click on the Column A heading. As with the rows, you can also select a different column or select multiple columns to repeat. One other setting you might want to change is found on the Page tab in the Page Setup window. There you can choose your document orientation if you want your rows or columns to print in landscape instead of portrait, for example. Have you ever needed to print an empty grid from Excel, but you struggled to get Excel to print cells without data? Learn about printing empty grids in Excel if you find yourself in a situation where it would be helpful.
He specializes in writing content about iPhones, Android devices, Microsoft Office, and many other popular applications and devices. Read his full bio here.


