But if you’ve been using this feature then you likely noticed that the videos you create don’t have any sound. Luckily you can learn how to get sound on screen recording videos on an iPhone by adjusting an option found on a secret menu in the Control Center.
How to Enable Audio for Screen Recordings on an iPhone
Our guide continues below with additional information about how to get sound on screen recording iPhone videos, including pictures of these steps. If you’ve ever needed to show someone how to do something on their iPhone, or if you have something on your device that you want to share with someone else, then you may have already discovered the screen recording tool. You simply need to get your iPhone ready for what you want to record, find the Screen Record button, then tap Start Recording. Even if you have chosen to enable screen recording, there are probably some things that you want to adjust when you record your screen. But you may have also noticed that it didn’t include sound when you made the recording, and it’s very likely that you are having trouble finding a way to enable it. In fact, you might have even come to the conclusion that it’s just not possible. But you can turn on the microphone during iPhone screen recordings to include audio by opening the Control Center, tapping and holding on the Screen Recording button, then tapping the Microphone button. The screen recording feature that was introduced in iOS 11 was something that iPhone owners have been hoping for since it became something that was common on other smartphones. Fortunately, the screen recording feature is easy to use and records excellent video, but you might be struggling with audio. You are able to record audio while screen recording on an iPhone, and the means of recording that audio is accomplished through the iPhone’s microphone. Our tutorial below will show you where to find and enable this option so that you can start adding sound to your screen recordings. If you have a pair of Sony Bluetooth headphones that you want to use with your iPhone, then check out this how to pair Sony headphones to iPhone guide for more information.
How to Turn on the Microphone for Screen Recording on an iPhone (Guide with Pictures)
The steps in this article were performed on an iPhone 7 Plus in iOS 11.3. This guide assumes that you have already turned on the screen recording feature by adding it to your control center. If not, this article will explain how. Note that the audio that is recorded when you are screen recording is done so through the microphone. This will not record the device audio directly. So if you have headphones or AirPods in while you are doing this, you probably won’t hear anything on the video.
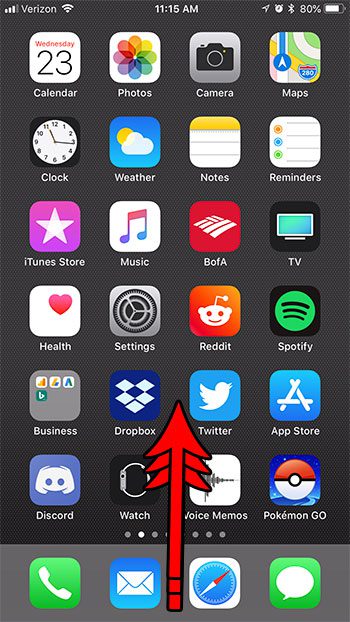
Step 1: Swipe up from the bottom of the screen to open the Control Center.
On newer iPhone models that don’t have a Home button, you need to swipe down from the top-right corner of the screen to open the Control Center instead.
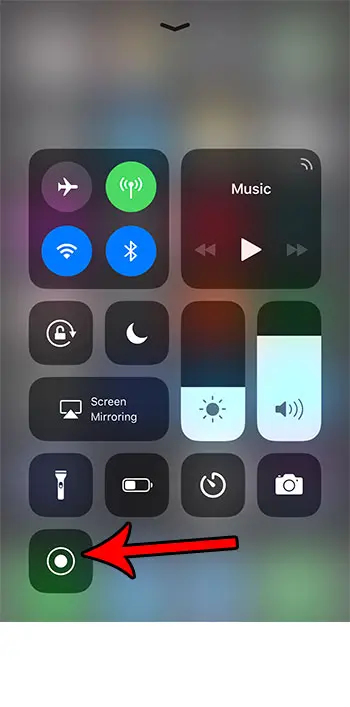
Step 2: Tap and hold on to the screen recording button.
It’s the icon that looks like a small filled-in circle inside of a larger, open circle.
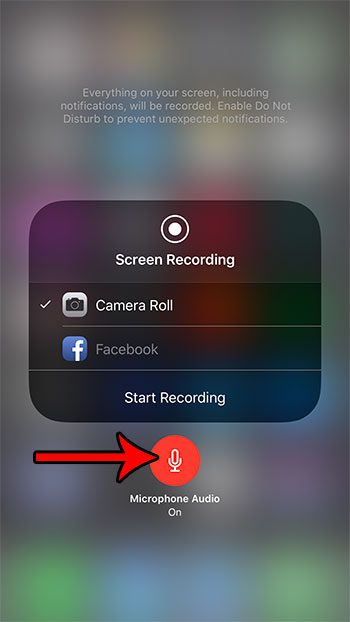
Step 3: Touch the Microphone Audio button at the bottom of the menu to enable it.
As indicated on this screen by the “Everything on your screen, including notifications, will be recorded. Enable Do Not Disturb to prevent unexpected notifications” message, you might need to enable Do Not Disturb. You can also do this from the Control Center by tapping the Do Not Disturb button, which looks like a crescent moon. In newer versions of iOS you might need to tap the Focus button first to locate the “Do Not Disturb” option. Our tutorial continues below with additional discussion on the iPhone screen recording feature and including audio when you create those recordings.
More Information on Sound for the iPhone Screen Recording Feature
The list of apps that is shown when you open this menu are the options that you have as to where you would like to save the screen recording. The one with the check mark to the right of it is where any current screen recordings will be saved. You can still use the screen recording feature even if you haven’t enabled the audio portion of the recording. There just won’t be any sound. You can then tap the Start Recording button to start recording your screen using the microphone to record audio. Once you are done with the screen recorder you can tap the red clock at the top of your screen, or you can open Control Center again and stop recording by pressing the same button that you pressed to initially record video. If you don’t see the screen recording button on the Control Center menu then it may have been removed at an earlier time. You can add it back by going to Settings > Control Center > then tapping the green + icon to the left of Screen Recording. Additional options can be added to the Control Center from this menu as well. You can also change the order of the icons on this menu by tapping and holding on to the three lines to the right of a button, then dragging it to the desired position. Note that some of the icons on the Control Center can’t be removed or relocated. Your screen recordings can take up a lot of space on your device, so you may find that you need to free up some storage if you are using the screen recording feature a lot. Our complete guide to deleting items is a great way to search your iPhone for different apps and files that are consuming the storage space on your device.
After the three second countdown the recording starts and will capture the content that appears on the screen. If you don’t see the screen record feature there then you may need to add it from the Settings menu. Go to Settings > tap Control Center > then tap the green + to the left of the Screen Recorder option. Simply tap Photos on your Home screen, touch the Albums tab at the bottom of the screen, then scroll down and select Screen Recordings. This means that anything that the microphone can pick up will be included as audio when generating the screen recording. if the internal audio or system audio on the phone is loud enough then it will be part of the audio, along with anything that you speak, or any noises around you that the microphone can pick up. While you might be looking for a way to tap a stop button to end the recording, you actually just need to touch the time at the top-left corner of the screen, then tap Stop on the pop up window that appears. You can use it by opening the Control Center, then tapping the Record button. Once you are done recording you can tap the time at the top of the screen and choose the Stop option. as we have discussed in this tutorial, the screen recording built into these devices will not record the screen with sound by default. If you want to record sound then you will need to tap and hold on the Record button and touch the Microphone button. If you already have a video recorded and you didn’t enable audio, then there is no way to recover audio for that recording.
After receiving his Bachelor’s and Master’s degrees in Computer Science he spent several years working in IT management for small businesses. However, he now works full time writing content online and creating websites. His main writing topics include iPhones, Microsoft Office, Google Apps, Android, and Photoshop, but he has also written about many other tech topics as well. Read his full bio here.
You may opt out at any time. Read our Privacy Policy